Tuesday, January 31, 2012

Feb 1st, Works in Progress

Baby "love" quilt, finished last week!


Working on my For the Love of Solids Swap . . . 
this is one idea in progress . . . 
a Swoon made of solids.
(no progress on my other swoon blocks -- I have 3 done, 6 to go)


Such a fun block,
but oh no, 
on one of these I sewed the triangles in the opposite direction.
Do I really want to rip it out and re-do it? 
No.
I might wait until I have the rest done,
then see how out of place it looks.
Or should I alternate directions with each row?


I also jumped in on Faith's Solstice Stars Quilt Along.
I absolutely love the blocks that she has chosen,
especially the paper pieced ones!
This is way too many things to have in progress.
I need to finish something, soon!

Today my daughters' school ice skating party has been canceled,
so I'll have more time to sew.
We've had such warm weather here in Minnesota,
the ice rink at their school has melted!

Linking up to:
WIP Wednesday at Freshly Pieced

Sunday, January 29, 2012

Love Quilt


 Have you ever not loved your binding choice,
so much so that you had to cut it off and start over?
I did that last week!
I just couldn't stand the brown/multi dot binding
on this quilt --
I thought it would be just perfect,
but when it was finished, I really didn't like it!
 Much better with a pink solid binding, don't you think?
Scrappy solids might also have been nice,
but I didn't have the patience for that last week.
 I know several lovely ladies who are expecting babies
within the next 6 months, how fun!
So this quilt will be for whichever one has the first girl!
 
The "love" is paper pieced (pattern from Kelly), 
with bright scraps of Kona solids.
I was inspired by this gorgeous quilt on Flickr, 
and just had to make one!
For the backing I used pink minky dots,
super soft and cuddly.
Love it!


Linking up to:
{Sew} Modern Monday at Canoe Ridge Creations


Fresh Poppy Design

Thursday, January 19, 2012

Tangerine Tango

This cute little asterisk mini quilt is my entry
 for the Tangerine Tango Challenge on Flickr.


One of my college roommates LOVED orange . . . 
I can still picture her in one of her many orange sweatshirts!
And I never really liked it until I started quilting.
But now I LOVE the brightness and energy
 that the color orange gives to quilts!

I did an all over pebble quilting design in the white spaces,
to make the colors pop.
I love the texture created by pebble quilting!

This mini quilt is actually a pillow -- 
for the back I used this bright "good earth" print
by Alexander Henry--
lots of the tangerine shade of orange in this print!
Linking up to Finish it up Friday at crazymomquilts!

Wednesday, January 18, 2012

Works in Progress, 1.18.12

Happy Wednesday!
I've had lots of time to sew during the past week . . .
and a lot of little projects in progress!
Finished 4 x 5 bee blocks

I wrote a tutorial for this scrappy asterisk block,
find it here!

 Still swooning along . . . . 
Block #2

Block #3

Nearly finished with this baby quilt:
Paper pieced "LOVE" by Kelly


 Still trying to decide on an arrangement for these 
Circle of Star blocks that keep arriving in the mail
as part of the Peace Circle of 


Nearly finished with this mini quilt,
my entry in the contest
As soon as I get the binding finished,
I'll write more about this one!

Linking up to:
WIP Wednesday at Freshly Pieced

Sunday, January 15, 2012

Scrappy Asterisk Tutorial

These are my 4x5 bee blocks for this quarter!
(Inspired by this & this on flickr)
They were so much fun to make!
And a great way to use up scraps - even teeny tiny scraps!
There is a great tutorial here on how to make asterisk blocks,
but I wanted mine scrappier.  And with a border, to use more scraps.

Here's how I made them:


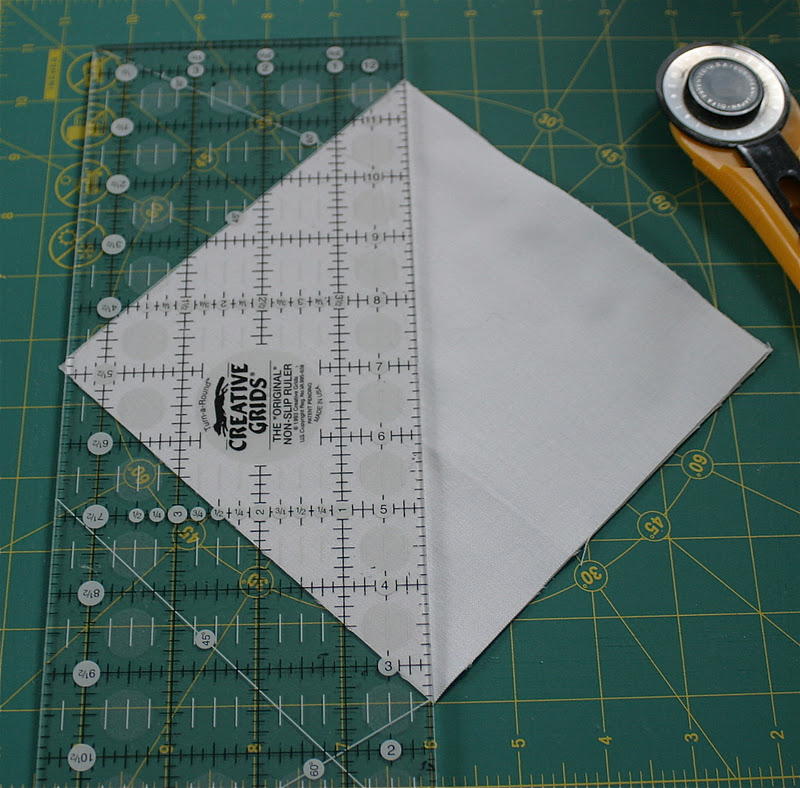
Start with a 6.5 inch white square, and a bunch of 1 inch strips of scraps.
(you could really use any size square, depending on your scraps--
starting at 6.5 inches gave me a total finished block size of 12.5 inches--
what I needed for the 4x5 modern bee blocks)
Cut the 6.5 inch square on the diagonal once.


You can use either one long 1 inch strip,
or 2 shorter strips, sewn together.

For this block I'm going super-scrappy,
so I'm using 2 strips! 

To sew the strip to the white triangle,
first crease the triangle in half,
then line up the seam of the scrappy strip with the seam,
 and pin. 
(it doesn't have to be perfect)
When you have both sides of the strip sewn, press seams inwards.


Now cut in half on the diagonal,
 trying to cut very close to the seam of the 2 initial scrappy strips.  Don't worry if the cut isn't perfect (mine wasn't) -- you'll lose it in the seam allowance. 

Keep going!
Once you've got the 2 diagonal scrappy strips sewn, sew the vertical piece,
 then the horizontal.  
 It looks like here I'm using 1 strip, instead of 2 sewn together, opps!
I guess this scrap was longer than the others!


 For the "top" strip -- the last vertical piece, you can either use one strip (as above),
or two -- but if you use two,
sew a 1 inch square of your background fabric between the 2 scrappy strips.


Here is the finished asterisk!
It would be fine to stop here, but I wanted to make it wonky,
and use up more scraps in a border.
 Cut 2 rectangles, one 4 x 8.5, the other 4 x 10.5 inches.
 Now cut diagonally, at about 3 inches on the top left, to 1 inch on the bottom left, creating 2 "sort-of" triangles.
 Lay out triangles like this, and sew each side.

 Square up to 8.5 inches.

 Now add a 1 inch scrappy strip border on all sides,
then a 2 inch white strip after that.
 Finished!
 And here's how neat the back looks, with seams all pressed inwards.

 Here's another modification,
if you have smaller scraps and like this look better:

Or try gray for the background:
 Or try an all red scrappy asterisk
(bottom left block):
What a great use of scraps!
I hope that you've enjoyed the tutorial --
please let me know if you have any questions!

Be sure to check out all of the amazing projects and ideas
 being shared at Rachel's Scrap Attack Quilt-Along on flickr!

Linking up to:
{Sew} Modern Monday at Canoe Ridge Creations


Fresh Poppy DesignLawson and Lotti