

These are my 4x5 bee blocks for this quarter!
They were so much fun to make!
And a great way to use up scraps - even teeny tiny scraps!
There is a great tutorial here on how to make asterisk blocks,
but I wanted mine scrappier. And with a border, to use more scraps.
Here's how I made them:


Start with a 6.5 inch white square, and a bunch of 1 inch strips of scraps.
(you could really use any size square, depending on your scraps--
starting at 6.5 inches gave me a total finished block size of 12.5 inches--
what I needed for the 4x5 modern bee blocks)
Cut the 6.5 inch square on the diagonal once.


You can use either one long 1 inch strip,
or 2 shorter strips, sewn together.
For this block I'm going super-scrappy,
so I'm using 2 strips!


To sew the strip to the white triangle,
first crease the triangle in half,
then line up the seam of the scrappy strip with the seam,
and pin.
and pin.
(it doesn't have to be perfect)
When you have both sides of the strip sewn, press seams inwards.


Now cut in half on the diagonal,
trying to cut very close to the seam of the 2 initial scrappy strips. Don't worry if the cut isn't perfect (mine wasn't) -- you'll lose it in the seam allowance.
Keep going!
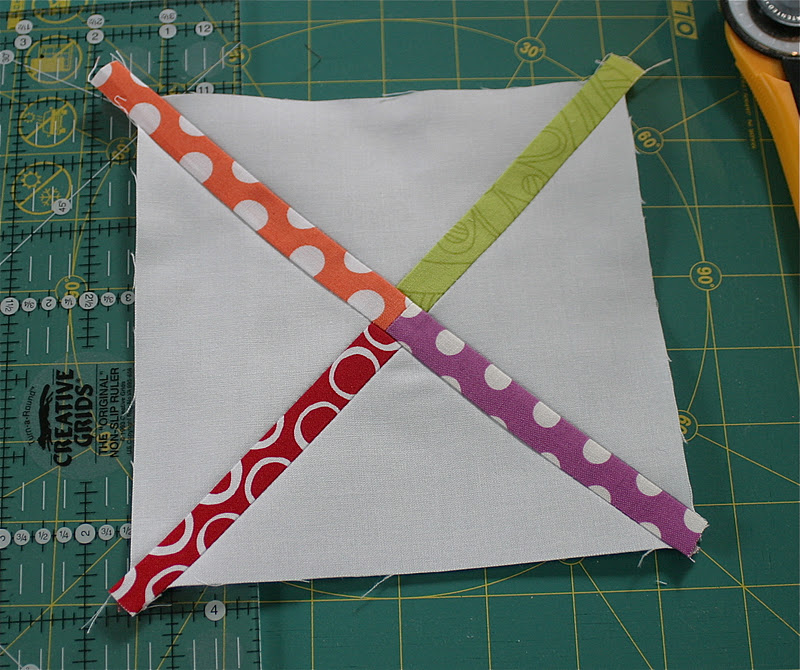
Once you've got the 2 diagonal scrappy strips sewn, sew the vertical piece,
then the horizontal.

It looks like here I'm using 1 strip, instead of 2 sewn together, opps!
I guess this scrap was longer than the others!


For the "top" strip -- the last vertical piece, you can either use one strip (as above),
or two -- but if you use two,
sew a 1 inch square of your background fabric between the 2 scrappy strips.


Here is the finished asterisk!
It would be fine to stop here, but I wanted to make it wonky,
and use up more scraps in a border.

Cut 2 rectangles, one 4 x 8.5, the other 4 x 10.5 inches.

Now cut diagonally, at about 3 inches on the top left, to 1 inch on the bottom left, creating 2 "sort-of" triangles.
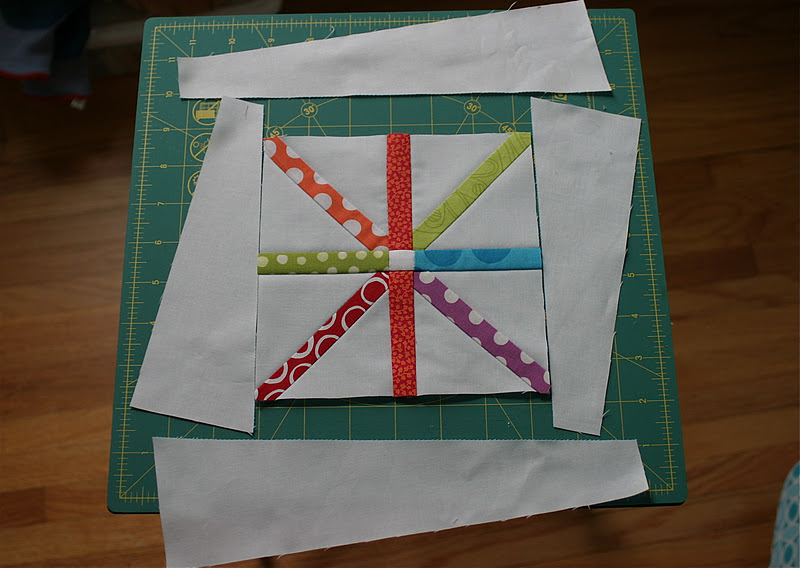
Lay out triangles like this, and sew each side.


Square up to 8.5 inches.


Now add a 1 inch scrappy strip border on all sides,
then a 2 inch white strip after that.

Finished!

And here's how neat the back looks, with seams all pressed inwards.

Here's another modification,
if you have smaller scraps and like this look better:
if you have smaller scraps and like this look better:

Or try gray for the background:

Or try an all red scrappy asterisk
(bottom left block):

What a great use of scraps!
I hope that you've enjoyed the tutorial --
please let me know if you have any questions!
Be sure to check out all of the amazing projects and ideas
Linking up to:


These are fabulous! Thanks for the tutorial!
ReplyDeleteHow very timely that you should write this post! Just today I was searching for an asterisk block tutorial. Yours is just great, and I love the scrappy version. Thanks so much!
ReplyDeleteGreat tutorial, Michelle! This is a really fun block, and I love how you showed the alternative look with a gray background. I can't decide which I like better, the gray or the white - they're both great!
ReplyDeleteWhat a fun colorful block! I've added your tute to GXQ's Block Library! Thank you!
ReplyDeleteThanks for sharing! It's good to see them scrappy!
ReplyDeleteWow, I love that block. Thanks for the tutorial, Michelle. I'm going to make this as one of my Modern Block Monday blocks. Can't wait to try it!
ReplyDeleteYour tutorial is fabulous! Thanks, I will try this today!
ReplyDeleteCool, thanks for sharing!
ReplyDeleteThose are great! I am definitely going to have to try that! Wonderful tutorial :)
ReplyDeleteLove this block!! Thanks for the awesome tute Michelle!
ReplyDeleteWhat a fun block, it would be great to decorate for a birthday party!
ReplyDeleteSweet! I just watched the first Craftsy Block of the Month video yesterday. I can't wait to whip up a couple of blocks myself :-D
ReplyDeleteThis is awesome! Thanks for the tutorial.
ReplyDeleteGorgeous blocks and great tutorial, definitely going on my to do list. Thanks for linking up for Tutorial Tuesday ;-)
ReplyDeleteHow fun was that! What a happy lil' block!
ReplyDeleteOh, amazing!!! I love how it looks, thanks for sharing.
ReplyDeleteWhat a great block! This is going to be a must try tutorial!
ReplyDeleteI'm so making this, thanks for the tutorial!!
ReplyDeleteBrilliant! This tutorial's a keeper. So fresh, clean and funky. I love it!
ReplyDeleteElizabeth E!
occasionalpiece.wordpress.com
Thanks for the tutorial.I love!
ReplyDeleteWhat a great tutorial. I plan on using it. Love these cheery little asterisks.
ReplyDeleteLOVE this! I've been wanting to make an asterisk block and now I have a good resource!
ReplyDeleteLOVE this! I've been wanting to make an asterisk block and now I have a good resource!
ReplyDeleteHi,
ReplyDeletethank you for the tutorial. This looks really interesting.
Beatrice.
This is a great tutorial. Thanks.
ReplyDeleteFun block! Thanks for the tutorial.
ReplyDeleteOops! I almost forgot to drop by and say thanks for a great tutorial. Here's a link to my version incase you are interested:
ReplyDeletehttp://craftandnappies.blogspot.co.nz/2012/08/wip-wednesday-scrappy-asterisk.html
Wow!!! So crisp and springy! I love this method of making a quilt. And I love your fabric choices!
ReplyDeleteAnne